Halloween Treats – Meringue Bones
A light weight, gluten-free party favorite for all ages is bones. I’m talking meringue bones. It’s simple, fast and impressive. Most important, it doesn’t require a fancy icing tip. As a backdrop, I’ve tried a number of recipes from major sites, and I hated all of them save one, and even that, I modified. The following has a basis in the recipe from fishieking on allrecipes. My first round, I didn’t totally like the consistency of the bones (too mushy both in the better and final outcome). I increased the amount of cream of tartar just a hair and it was perfect.
Tip: make sure the Cream of Tartar (its a spice, just in case you haven’t heard of it), is within the expiration date. The first batch was ruined, and I looked at the culprit, which turned out to be 6 months overdue on the expiration. The next batch made with a brand new bottle turned out normally.
Requirements
Egg beater, big Ziploc plastic bag, parchment paper to line the cookie sheet.
Ingredients
6 egg whites (room temperature)
3/4 teaspoon cream of tartar
1 pinch salt
1 1/3 cups white sugar
2 teaspoons vanilla extract (I used bourbon or Madagascar vanilla. it makes a huge difference)
Directions
Preheat oven to 225 degrees F (110 degrees C). Line 2 baking sheets with parchment paper (I prefer this to the tinfoil in the original recipe. it’s less sticky)
Beat the egg whites with cream of tartar and salt with an electronic mixer until egg whites are foamy. Gradually beat in sugar, a few tablespoons at a time, beating until the sugar dissolves in the meringue before adding more. Continue beating until the meringue is glossy and forms sharp peaks. Add the vanilla. At this point, the batter should be very gloppy (a technical term of course).
Spoon the batter into a Ziploc or pastry bag.
Tip: when I read this direction, I thought great. Reality is that I use a large KitchenAid mixer and couldn’t hold the bowl, and the Ziploc and spoon the stuff. I enlisted my husband, who held the bowl as I used a spatula to slide the batter into the bag.
Cut the end of the tip with a scissors.
Tip for formation of the bones.
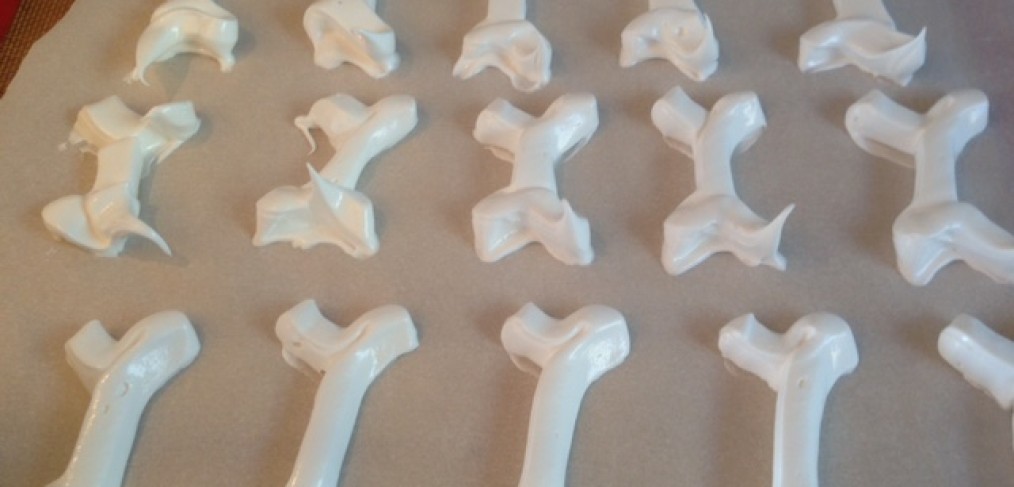
Start at the upper left hand corner, draw down to the bottom of the V. Then go up to the right of the V. Quickly take the tip straight down for the long center. Then draw down for the lower left, then up to the base V then down to the lower right. Lift up the tip.
I made a few testers, which necessitated me changing the grip of my bag. It’s easy enough to push out, but half-way through, the bag will deflate and air bubbles will collect. To prevent this, stop, open the bag, squeeze out the air then resume.
Meringue bones – gluten free party favorite
Key directions for cooking
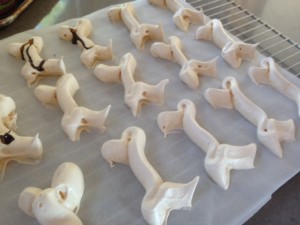
Place the cookie sheets and bake for 1 hour. Do NOT open the oven door, not even to peek. I ignored this part of the directions (thinking it wouldn’t make a difference. It did. They flopped). So, lesson learned. Leave it shut for an additional hour. (seriously. do not skip this).
When removing the bones, slide off the parchment paper onto a rack. Wait until cooled, then place in an air tight container.
Tip for storage
The original recipe didn’t give any commentary on storage, but I read that they could be sealed, room temperature for several days. I made one batch on Tuesday, thinking they would be fine for Saturday. Well, I checked on Thursday, and they’d become really brittle. By Friday, they were falling apart at the touch, with the exception of a few of the thicker ones. That meant I ended up creating a new batch, which I served the following day.
Pictures show the formation and the outcome.
By the way- I had these on a “gluten free” table, but all the guests had them- adults and kids (about 50 total). They were the first to go!