October 27, 2012
by Sarah Gerdes
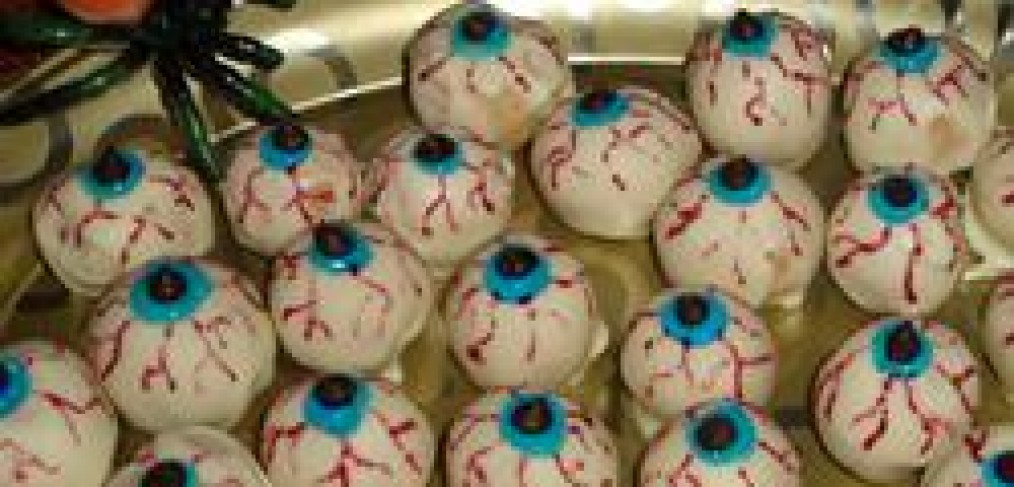
Best Halloween Treats- Peanut Butter & White Chocolate Eyeballs
Peanut Butter Eyeballs
This is actually more of a truffle recipe, because the peanut butter concoction isn’t baked. It’s beyond fatty, rich and creamy. The key is having the dough chilled so you can work with it during the two rounds of molding and shaping. Start with it first, as it takes the most time.
Ingredients
|
1 1/2 cups creamy peanut butter
1/2 cup butter, softened
2 1/2 cups confectioners’ sugar, sifted
1 tablespoon vanilla extract
12 ounces white chocolate, chopped
|
2 tablespoons shortening
2 drops blue food coloring
1/2 cup miniature semisweet chocolate
chips
red food coloring (optional)
|
DIRECTIONS
| 1. | Beat the peanut butter and butter with an electric mixer in a large bowl until smooth. Beat in the sugar and vanilla. Cover and refrigerate for 30 minutes. Roll chilled dough into small, eyeball-sized balls and place on 2 baking sheets lined with wax paper. Refrigerate for another 30 minutes. |
| 2. | Melt the white chocolate and shortening in a microwave-safe glass or ceramic bowl in 30-second intervals, stirring after each melting, for 1 to 3 minutes (depending on your microwave). Do not overheat or chocolate will scorch. Dip each eyeball into the white chocolate and transfer to the waxed paper until the chocolate has set. You can chill them in the refrigerator. |
| 3. | Stir a few drops of blue food coloring into the remaining melted white chocolate. Make a round “iris” on the top of the cooled eyeball and press a mini chocolate chip in the center for a “pupil.” For an extra spooky bloodshot eyeballs take a toothpick dipped in red food coloring and make squiggly lines on the eye. |
 |
| This was the professional version (not use of light blue around the eyes. I think it makes a big difference) |

A couple of tips:
1. Use a small ice cream or cantalope scooper for the dough. The provide uniformity of size and shape. Drop all these on the lined cookie sheet and put in the fridge.
After melting the chocolate, you can roll the chilled balls around in the choc and then place quickly back on the baking sheet. They will dry fast, but the longer the dough is at room temperature, the soggier it gets, which makes it harder to work with.
2. Use a squeeze bottle of food coloring instead of applying the blue with a toothpick or paintbrush. That takes way too much time. I used black for my color and it was over in seconds. Then me and my 7 year old poured a 1/2 teaspoon (or so) amount of red food coloring in a little ramiken. Take a toothpick (as directed) and then make the lines.
3. An added touch–Blue around the black eyes. My daughter was having so much fun, I then took a bit of blue, gave her a new toothpick and encouraged her to draw a ring of blue around the pupils. She did great.
Only downside of this dessert– after a few hours at room temperature, they get mushy on the inside- but the outside looks perfect.
 |
| My version- still yummy! |
Next up: Witchy fingers- two versions