
Halloween treats- Witchy Fingers
One of my two, personal favorite bite-size treats. The other is the gruesome ripped ears. Both of these are divinely gross and absolutely delicious. They are also made from the same dough. The only difference is the witchy fingers are cooked longer while the ripped ears are slightly undercooked. I might also add that these take a bit of time (about an hour and a half) but are great to do with kids. They are also big attention getters, which I also like!
Promise- people get intimidated by the nails (the almonds) and creating the actual fingers. This is super easy. My motto is: if I can do it, so can you. I’ll give you step by step pictures on this. You can do it!
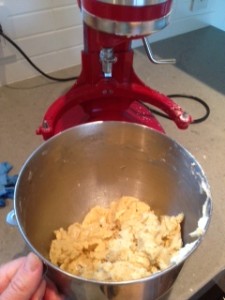
Took a picture to show what “just incorporated means.”
Requirements
Food coloring. A box will give green, yellow, red and blue. You will use all but the yellow.
A knife, rolling pin, and small paintbrush (to color on the blood and moldy ear slice).
Parchment paper
Ingredients (first, the nails)
Food coloring – you will use this last
30 blanched almonds
Directions
In boiling pot of water, dump the almonds. You may want to do more than 30, just in case a few split.
After 1 minute (exactly) remove and strain. Immediately run cold water (from the tap) is fine. Only need to do this about one minute.
Dump on a paper towel. As you start to rub the almonds, the peels will come off. Not all though–perhaps not even half. Don’t worry. With your fingertips (thumb and forefinger) you can easily rub once or twice and the shell slips off.
Place the blanched almonds on the cookie sheet (this is where you will paint them once fully dry)
At this point, stop and make the cookie dough. The reason is you will need to refrigerate the cookie dough. As this happens (about 30-40 minutes or longer) you will paint return and paint the fingers.
Ingredients- Finger Dough
2 large eggs
1/4 teaspoon pure vanilla extract (bourbon or Madagascar are my preferred choices)
8 tablespoons (1 stick) salted/sweet butter (not unsalted. The taste is SO much better this way)- room temperature
1/2 cup confectioner’s sugar (powdered sugar)
5 tablespoons granulated sugar
Pinch of salt (I tend to use Himalayan pink salt as it gives the recipe a pop), and when it says “pinch” I use my grinder, and that means 3 turns of the grinder
1 2/3 cups of all-purpose flour
Directions
Separate 1 egg. set aside the white in a bowl.
In a small bowl, which together the yolk, remaining egg and vanilla. Set aside.
In a large bowl (like a KitchenAid), use the padded attachment and combine the butter, powered sugar, granulated sugar and salt. Beat on medium speed until well combined. Add the egg mixture and beat until smooth, about 2 minutes. Add the flour, mixing on low speed until just incorporated (over mixing makes the end result hard).
Wrap the dough first in parchment paper if you have it, the plastic. If you have neither, an airtight Ziploc bag will work. Chill until firm, 20-30 minutes.
Tip: For rolling out, divide in half. The reason is simple. It takes time to roll, parse (or separate) the individual dough pieces for fingers. then you must roll, detail and place the finger. The remaining dough will get too soft, and become gooey. So take out only as much as you can reasonably use before it gets warm, which is about half.
At this point, place the dough in the fridge and paint the fingers.
Painting the fingers
place red, green and or blue food coloring in separate bowls. holding the almond between fingers, paint both sides. Tip: I use a rubber glove so I don’t stain my fingers. It takes several days to come off and I hate that. Then again, it is Halloween so who cares? Let stand until you are ready to roll out the dough and make the fingers.
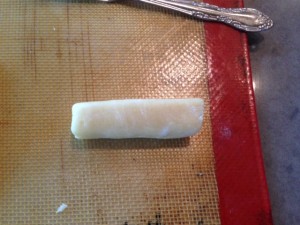
this is the dough, already rolled out, then cut and formed into a 2-2.5 inch piece
Making the fingers
This fun. Don’t be worried. Just put on some good chill music and go for it.
Take half the dough and place the other half back in the fridge. Roll it out to @1 cm thick. Using a cutting utensil (I use a pastry spatula), cut the pieces into a manageable size (e.g. about the length of half a real finger. It will elongate as you roll it out.
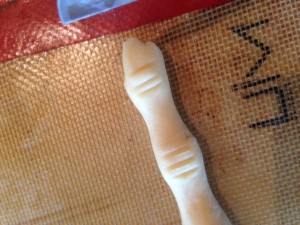
Roll the dough out into @a 3-inch piece. Then using your forefinger and third finger, depress a little, which will raise the middle (to create the middle knuckle). Adjust the end tip, to resemble the end of the finger. Adjust as necessary– e.g. raise the center, depress the in-between parts (as they will raise slightly during baking).

depress the center. this makes the knuckles. 3 simple lines will do it
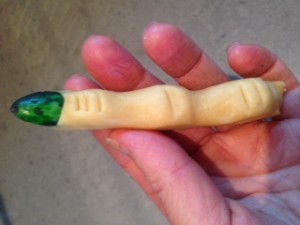
Take one of the almonds and wedge it within the end. Don’t place on top, as this will ensure it falls off after baking (I’ve done this before and ruined the whole batch). Make sure you have a bit of dough above, below and on all sides.
Take a knife or other untensil and create the ridges for the knuckle. Walla! you have created your finger.
Tip: Create the entire batch of the fingers and then brush lightly with the egg white. If you do this too soon, you will depress the ridges on the knuckles and it won’t look that realistic.
now you are ready place the almond as the fingertip
Tip: Err on the side of exaggeration. In other words, if the ridges and length of the fingers aren’t pronounced enough, the finger will come out basically smooth. So if you are worried, its better to have a finger that’s super bony rather than one that looks flat and normal. You don’t want normal!
For cooking
Heat the over to 350 degrees. Line two baking sheets with parchment paper or Silpats (French non stick baking mats are my preference).
Using a non-stick brush, brush lightly with egg white.
this is what it looks like before its cooked. you can add as much dough around the edge as you want. for fun, I sometimes go back and make them scraggly, but it tends to gross people out then they won’t eat them!

This is a row PRE- covered with egg whites. I forgot to take a picture of that, but they slightly glisten when covered with the egg white
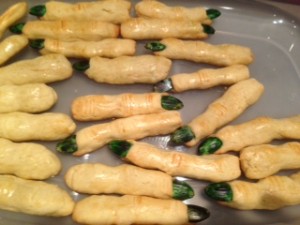
this is a pic of just the green-tipped ones. This year I made red, green and then black.
For the presentation, my favorite way to display for eating is sticking out from within a cauldron. That way they are reaching out to you, saying EAT ME!