Halloween Treats- Gruesome Ripped Ears
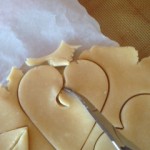
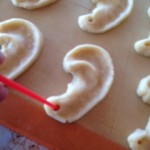
after using the heart-shaped cookie cutter, take your edged knife (this is a pastry/fruit knife) and make a curl that will make the form for the inner ear. carry it all the way down
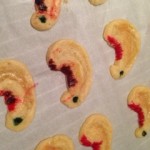
The finished product
This is my other divinely gruesome treat. Ripped ears. It is made from the same dough that is in my recipe for Witchy Fingers. Since I’m sure you’d hate popping back and forth, I’m putting it below. This is far easier to create and form the ears–so once again, don’t be intimated. Let your inner spooky-self flow as you create these.
Requirements
Food coloring and a small paintbrush
If you have it, a heart-shaped cookie cut-out will make your life a LOT easier. If not, you can use a round one and modify it. OR, you can free form with a sharp, non-serrated edge knife.
Ingredients- Dough
2 large eggs
1/4 teaspoon pure vanilla extract (bourbon or Madagascar are my preferred choices)
8 tablespoons (1 stick) salted/sweet butter (not unsalted. The taste is SO much better this way)- room temperature
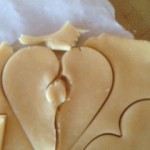
this is what it will look like after. make sure to take eat the center circle:)
1/2 cup confectioner’s sugar (powdered sugar)
5 tablespoons granulated sugar
Pinch of salt (I tend to use Himalayan pink salt as it gives the recipe a pop), and when it says “pinch” I use my grinder, and that means 3 turns of the grinder
1 2/3 cups of all-purpose flour
Directions
Separate 1 egg. set aside the white in a bowl.
In a small bowl, which together the yolk, remaining egg and vanilla. Set aside.
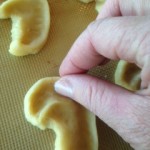
mold and shape the ear using your thumb and forefinger. Before this, I will typically pick it up and work it in my fingers for the basic shape, then put in on the Siplat cooky sheet and get it a little better.
In a large bowl (like a KitchenAid), use the padded attachment and combine the butter, powered sugar, granulated sugar and salt. Beat on medium speed until well combined. Add the egg mixture and beat until smooth, about 2 minutes. Add the flour, mixing on low speed until just incorporated (over mixing makes the end result hard).
Wrap the dough first in parchment paper if you have it, the plastic. If you have neither, an airtight Ziploc bag will work. Chill until firm, 20-30 minutes.
Making the ears
Divide the dough into two halves. Put one half back in the fridge to keep it cold.
Roll out to be @1 cm thick. If you are going to err, make them a bit thicker. If the dough is too thin, it will tear and you have to start all over (e.g. chill, roll out then form).
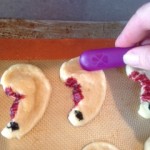
using the end of the paintbrush (or a toothpick) create a hole to represent an earhole (so you can make it black or colored later)
Use the heart-shaped cookie cutter. Using a knife, make a basic ear (see the pictures). Lift one side out, then start to form the ear. The key technique here is to use the thumb and forefinger to create the ridges of the outter and inner ears. The bottom lob can be modified, but again, don’t make it too thin or it will rip and not hold its shape.
Tip: as with the witchy fingers, if you are going to ERR, do so on the side of overexaggeration. It’s better to have an ear that is thick and has form than one that’s too thin and doesn’t hold a shape.
Once this is done and the ear if formed, take the edge of a knife (I use a pastry end that has a ridge for texture) and make some ‘cut-lines’ in the inner ear–which is actually the ripped part.
Painting the ears is really the easy part. First, color the holes. This does nothing more than make it look ‘ear-like’ and gorey. The next painting is on the inner ear, the part that’s ripped. Play around with this. Brighter red makes the blood look fresh while darker blood (red mixed with some blue or green) gives it an older, burnt look.
The both taste great!
food coloring in a little pie dish (I use these micro pie dishes that are only about 2 inches across) for convenience
Tip: wait for a few minutes before you brush on the egg white, and AVOID the painted parts, trying to get along the edges and in the depressed area.
Bake at 350 degrees for 8-10 minutes. You should underbake these little because you’d rather have them moist than dry. They hold for 3 days in an airtight container. After that, they simply don’t taste that great.
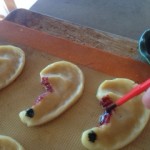
painting the inner (ripped) ear
sometimes, after baking, the ear will raise, and you will want to counter this by using the edge of a spook or whatever is handy an press down along the inner ridge. This will give the ear the best shape possible. It holds, so you only have to do this once.