Best halloween treats –

A week ago I threw my first, and probably last, adult halloween party, at least in this home. After 14 years of refusing to my request, Rog, out of the blue, said, “why not?” (of course, I think this was right after he’d returned home from a week of fishing for Salmon in Oregon and two days before leaving for Pinehurst, but whatever. I’ll take it).

“Witchy fingers” — the biggest hit of the night
The first thing I do is call cousin Nance, she of the ideas for the 9-foot witch that I ended up changing to a jilted bride, for lack of either witch costumes at Goodwill and the lack of ability to sew the darn thing.
“Make the eyeball trouffles” Nance recommends with all the must of a mom who had been on the road all night, ferrying her fourteen year-old daughter from Vegas to San Diego for yet another soccer championship game. “Or the witches fingers. Two kinds. Or the meringue bones. Or mummy pigs in a blanket (the party fav).”
Before I can get in a word, she promises to send me a dozen recipes that have pictures. I fret about ingredients, but she assures me I don’t have to worry.
My personal favorite-the chocolate rats (rolled in
white confectioners sugar or crushed choc graham crackers
for dark- although next time I might use sweetened dark
chocolate)
“This is American baking at its best,” she says me in a laughing-while-soothing voice. “It’s all butter, flour and some salt and vanilla extract in different measurements.” When I receive the recipes, she’s right. Save for a few recipes, the only addition is eggs and almond extract (for the almond variation of the witchy fingers) or the sweet witchy fingers, and chocolate (white and semi-sweet) for the RIP cookies an coffin brownies.
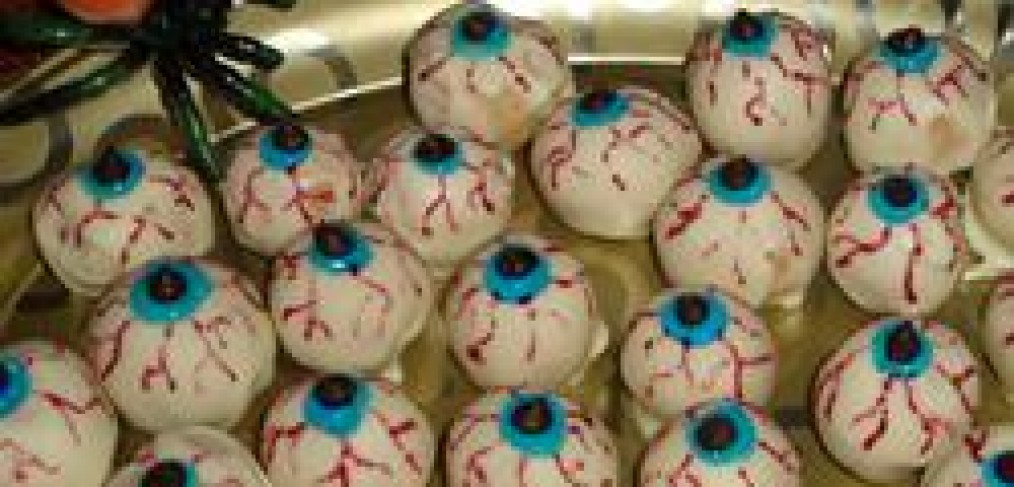
Peanut truffle eyeballs covered in white chocolate
For simplicity, I think I’m going to include a few recipes in this blog, and then break them out into separate blogs. Just for grins, I’m going to include the professional photo (from Nancy’s original emails) and then my ‘reality’ photo. It’s nice to know that they all taste the same, no matter the look (in theory, that is). 
The first thing I do is crank up some Lana Del Rey Blue Jeans remix and get going.
And because I had nothing better to do, I used the ‘spooky template’ from Microsoft Powerpoint, changed the words and printed out a “Slimy Sarah’s Best Rancid Recipes. I overlayed this on top of my oldest and most word Barefoot Contessa Cookbook. I’m sure she didn’t mind.


Best Halloween Treats- Sweet Witchy Fingers

The only difference between this recipe and the original “almond” witchy fingers is that this has more sugar (shocker) and no almonds. the outcome on the dough is about the same.

Ingredients

2 tablespoons red food coloring

The almond with the skin gone

30 blanched almonds
2 large eggs (room temperature is best)
1/4 tsp pure vanilla extract
8 tbs unsalted butter (1 stick) room temp
1/2 confectioners sugar
5 tbs white granulated sugar
pinch of salt
1 2/3 cup flour

Directions

  1. Heat oven to 350 degrees. Line two baking sheets with Silpats (French nonstick baking mats) or parchment paper, and set aside.
  2. Place food coloring in a shallow bowl. Using a small paintbrush, color one rounded half of each almond. Set aside to dry.
  3. Separate 1 egg. Set aside the white. In a small bowl, whisk together yolk, remaining egg, and vanilla. Set aside.
  4. In the bowl of an electric mixer fitted with the paddle attachment, combine butter, confectioners’ sugar, granulated sugar, and salt. Beat on medium speed until well combined. Add egg mixture, and beat until smooth, about 2 minutes. Add the flour, and mix on low speed just until incorporated. Wrap the dough in plastic, and chill until firm, 20 to 30 minutes.
  5. Divide the dough in half. Work with one piece at a time, keeping remaining dough covered with plastic wrap and chilled. Divide the first half into 15 pieces. On a lightly floured surface, roll each piece back and forth with palms into finger shapes, 3 to 4 inches long. Pinch dough in two places to form knuckles. Score each knuckle lightly with the back of a small knife. Transfer fingers to prepared baking sheets. Repeat with remaining dough.
  6. When all fingers are formed, brush lightly with egg white. Position almond nails; push into dough to attach.
  7. After the fact, I made the sweet
    witchy fingers w/ black nails
    Tip: Unless you are going to eat immediately,
    place in a container or the cookies will dry out 
  8. Bake until lightly browned, about 12 minutes. Cool completely.

Best halloween Treats- Almond Witchy Fingers

Witchy fingers- you can use any color for the nails
I mixed it up with black

Almond Witchy Fingers

Ingredients
1 cup sugar
1 egg (room temp best)
1 tsp Almond extract
1 tsp Vanilla extract
2 2/3 cup Flour
1 tsp Salt
3/4 cup whole Almonds, blanched
2 squares melting chocolate (optional)

Directions

1. Combine the sugar, egg, butter, almond extract, and vanilla in a bowl. Mix in the flour, and salt. Cover and refrigerate the dough for about 30 minutes, or until it’s firm.
Once you have the (chilled) dough, use a scooper to create
a nice uniformity of size
Cut the ball in two or you will have ginormous fingers
Roll out the door
Enlist your kids and start painting
2. When you’re ready to shape the cookies, only take out a small portion of the dough at a time. Shape the cookies into fingers by rolling and working with your hands. Score the top of the cookie with a knife or spatula to make it look like the wrinkles in your knuckle. Press an imprint into the tip of the cookie with your finger to make a spot for the almond finger nail. Press an almond into the tip of each finger to look like a fingernail.
3. Placed on a cooking sheet lightly coated with no-stick cooking spray and bake at 325` for 20 to 25 minutes, or until the cookies are a very light golden brown. Let the cookies cool on a drying rack.
This will make about 30 fingers (depending on how
much dough you devour)

Tips:
1. I was very intimated by this, since I’m as artistically akin to a walrus (I flounder in my fatness on the beach as I watch others do the real work). However, used my scooper (same as previous recipe) to place the (chilled) dough on the parchment paper (on the cookie sheet). I failed on the first two attempts, as this resulted in a Fessick-size finger (that would be the giant in The Princess Bride). Go for something more human size. I then cut the dough ball in half. This was more realistic.
Remember to ‘score’ the fingers to make it took realistic
2. Round the dough into a ball (rolling between your palms)
3. Using your fore-and middle fingers, roll the dough on a flat surface (I used my breadboard with a bit of flour), pressing a little harder, resulting in one end being a little thinner.
4. Cut your time down dramatically by skipping the chocolate rims. I made it easy on myself and fun for the kids. I took a paintbrush, dropped red food coloring in a ramiken and painted the top of the (dried) blanched almonds. It definitely needed 2-3 coats to attain the deep-red color.
Allow the fingers to cool entirely before moving.
5. Last but not least- this recipe didn’t call for an egg white application, but I added it after the first batch looked–boring. Take 1 egg white and apply a nice, thin coating (using another paintbrush). This makes the finger shine in a nice-crusty-sort of way.
6. OH! be sure to push the almond fingernails in the dough a little ways–otherwise the fingernails will fall off.

Best Halloween Treats- Peanut Butter & White Chocolate Eyeballs

Peanut Butter Eyeballs
This is actually more of a truffle recipe, because the peanut butter concoction isn’t baked. It’s beyond fatty, rich and creamy. The key is having the dough chilled so you can work with it during the two rounds of molding and shaping. Start with it first, as it takes the most time.
Ingredients
1 1/2 cups creamy peanut butter
1/2 cup butter, softened
2 1/2 cups confectioners’ sugar, sifted
1 tablespoon vanilla extract
12 ounces white chocolate, chopped
2 tablespoons shortening
2 drops blue food coloring
1/2 cup miniature semisweet chocolate
chips
red food coloring (optional)
DIRECTIONS
1. Beat the peanut butter and butter with an electric mixer in a large bowl until smooth. Beat in the sugar and vanilla. Cover and refrigerate for 30 minutes. Roll chilled dough into small, eyeball-sized balls and place on 2 baking sheets lined with wax paper. Refrigerate for another 30 minutes.
2. Melt the white chocolate and shortening in a microwave-safe glass or ceramic bowl in 30-second intervals, stirring after each melting, for 1 to 3 minutes (depending on your microwave). Do not overheat or chocolate will scorch. Dip each eyeball into the white chocolate and transfer to the waxed paper until the chocolate has set. You can chill them in the refrigerator.
3. Stir a few drops of blue food coloring into the remaining melted white chocolate. Make a round “iris” on the top of the cooled eyeball and press a mini chocolate chip in the center for a “pupil.” For an extra spooky bloodshot eyeballs take a toothpick dipped in red food coloring and make squiggly lines on the eye.
This was the professional version (not use of light
blue around the eyes. I think it makes a big difference)
A couple of tips: 
1. Use a small ice cream or cantalope scooper for the dough. The provide uniformity of size and shape. Drop all these on the lined cookie sheet and put in the fridge.
After melting the chocolate, you can roll the chilled balls around in the choc and then place quickly back on the baking sheet. They will dry fast, but the longer the dough is at room temperature, the soggier it gets, which makes it harder to work with.
2. Use a squeeze bottle of food coloring instead of applying the blue with a toothpick or paintbrush. That takes way too much time. I used black for my color and it was over in seconds. Then me and my 7 year old poured a 1/2 teaspoon (or so) amount of red food coloring in a little ramiken. Take a toothpick (as directed) and then make the lines.
3. An added touch–Blue around the black eyes. My daughter was having so much fun, I then took a bit of blue, gave her a new toothpick and encouraged her to draw a ring of blue around the pupils. She did great.
Only downside of this dessert– after a few hours at room temperature, they get mushy on the inside- but the outside looks perfect.
My version- still yummy!
Next up: Witchy fingers- two versions

Best spiderwebs

Nothing kills my spook-mojo like cheap, inelastic fiberwebs. I spent the extra .50 cents, thinking, in my marketing mind, that it would be better than the cheaper brand (see below), I sprung for BooBatts at Lowes, and have been cursing at myself, throughout my house, ever since. How this product ever passed inspection, consumer tests or the buying manager at Lowes, let alone any retail is beyond me. It tears. It rips. It does NOT stretch. It’s the anti-stretch. It’s like glorified cotton balls packaged together and marketed as “Super Stretch Web.” False advertising claim. If I was a lawsuit oriented gal, I’d join a calss action.

Product review grade: F+. It gets the + because it’s white.

On the other hand, The CelebrateIt Halloween spider web is awesome. No link because the store where I bought it–Michaels— web site is so lame it doesn’t list it as an item. It stretches and holds together, creating the amazing sheer look. I have stretched this stuff five feet, and that’s after cutting it up a bit. LOVE IT.

Yes, it’s actually less expensive and oh, so much better. Grade: A+. The plus is because the price point is $2.49.